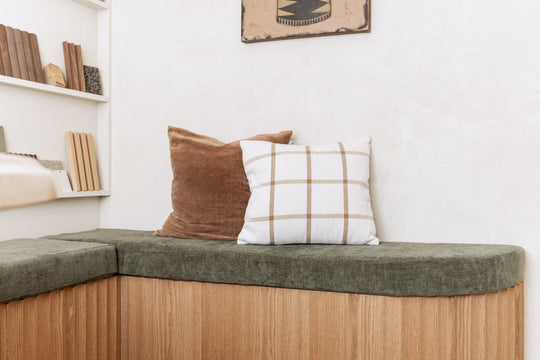
DIY your own Feature Panel Bench Seat in your home or commercial setting

In the world of interior design and home improvement, nothing quite adds a touch of charm and functionality like a well-crafted bench seat. Whether you're looking to optimize space in a cozy corner or create a stylish seating arrangement for your dining area, an L-shaped bench with curved ends can be the perfect solution. And with Feature Panel's innovative flexible range, bringing this vision to life is easier than ever.
In this guide, we'll walk you through the step-by-step process of creating your own L-shaped bench seat with curved ends using Feature Panel's Ripple Flex in Oak. So, roll up your sleeves and let's get building!
Materials Needed:
- Feature Panel flexible wood panel - we utilised the Ripple Flex in Oak
- Glue (we used Sikaflex Extreme Grab)
- Plywood
- Framing Timber
- Nails
- Jigsaw
- Saw - ideally circular saw
- Sandpaper
- Measuring tape
- Pencil
- Clamps
- Wood oil
- Cushions for seating comfort
Step 1: Planning and Measurements
Start by deciding the dimensions of your bench seat. Consider the available space and how many people you want it to accommodate comfortably. Use a measuring tape to mark out the lengths and angles for your L-shaped design. Don't forget to account for the curve at the ends of the bench.
Tip* Once you have built your bench seat base, wrap your Feature Panel around the base and mark it prior to cutting. This way you'll ensure you're not over/under measuring.
The standard height of a bench seat is between 400-450mm H - Ensure you account for your squab/cushion.
Step 2: Box Out the Frame
Using wood glue and nails, assemble the framing timber to create the framework for your bench. Ensure that the corners are square and the frame is sturdy. This will provide the foundation for your bench's structure.
Step 3: Add Plywood
Once the frame is constructed, attach plywood to the top and sides of the frame using wood glue and nails. This will create a solid base for your bench seat, providing support and stability. - Cut strips of ply and nail them around your curve to give strength and somewhere for your Feature Panel to glue to.
Step 4: Wrap Feature Panel's Ripple Flex
Now, it's time to showcase the beauty and flexibility of Feature Panel's Ripple Flex in Oak. With a circular saw and straight edge, carefully cut the flex panel to fit the front face of your bench. Then, wrap it around the frame, securing it in place with clamps and glue (we used Sikaflex Extreme Grab). The unique flexibility of the panel allows for easy manipulation, ensuring a seamless fit without the need for mechanical fixing such as screws or nails.
Step 5: Sand and Finish
Once the flex panel is securely in place, lightly use sandpaper to smooth out any rough edges and surfaces. Then, apply wood oil to enhance the natural beauty of the oak and protect it from wear and tear.
Step 6: Add Cushions for Comfort
To complete your build, add cushion squabs to the seating area of your bench. - If you don't have access to a sewing machine and tools required for the bench-seat cushion, paying a local upholsterer might be a great way to add the finishing touch.
With Feature Panel's Ripple Flex in Oak, creating a custom L-shaped bench seat with curved ends is a rewarding project that will add warmth and character to any space. From measuring and cutting to wrapping and finishing, each step of the process is made easier and more enjoyable with the versatile features of Feature Panel's flexible wood panel. So, why wait? Dive into your DIY project today and experience the satisfaction of crafting comfort with Feature Panel.
Visit our Instagram to view a step by step video guide.

